Static routing is an essential skill for managing modern networks, offering precise control over how data flows within a system. For Linksys MR9600 router users, adding a device to the static routing list can significantly optimize network performance. This guide will walk you through the concept of static routing, its benefits, and a detailed step-by-step process to configure your MR9600 router effectively.
Understanding Static Routing and Its Importance
Static routing is a manual process of defining a fixed path for data packets to follow across a network. Unlike dynamic routing, which adjusts to network changes automatically, static routing requires the user to specify routes explicitly. This ensures a stable and predictable network, which is critical for certain applications and environments.
The primary advantage of static routing is its reliability. By eliminating the need for constant route recalculations, static routes reduce the risk of network errors and latency. Static routing is particularly useful for small-scale networks, where traffic patterns are straightforward, and changes are infrequent.
For instance, static routing can be implemented in homes or small offices where a specific device, such as a server or printer, must always use the same path to ensure uninterrupted connectivity. With the MR9600 router’s advanced capabilities, static routing becomes even more powerful, enabling seamless management of devices and networks.
Overview of the Linksys MR9600 Router

The Linksys MR9600 is a cutting-edge dual-band WiFi 6 router designed for high-speed performance and extensive coverage. With its ability to handle up to 3Gbps speeds, it supports smart homes, gaming setups, and streaming environments effortlessly.
One of the standout features of the MR9600 is its advanced routing capabilities, including static routing. Static routing allows you to customize traffic flow, ensuring critical devices receive priority access. The router’s intuitive interface simplifies the configuration process, making it accessible even to users with minimal technical expertise.
Before diving into the configuration process, it’s essential to familiarize yourself with the MR9600 dashboard. This ensures you can navigate its features quickly and efficiently. Understanding this layout will save time and make troubleshooting easier.
Preparing to Add a Device to the Static Routing List
Before configuring static routing on your MR9600, a few prerequisites must be met. First, ensure your router’s firmware is updated to the latest version. Firmware updates often include bug fixes and security patches that improve overall performance and functionality.
Next, gather key information about the device you intend to add. This includes the device’s IP address, subnet mask, and default gateway. These details are crucial for configuring static routes correctly. You can usually find this information in the device’s network settings or by using a network scanning tool.
It’s also a good idea to plan your network layout before making changes. Identify the devices that will benefit from static routing and ensure their placement within the network is optimal. Proper planning can help prevent conflicts, such as overlapping IP addresses, that may arise during configuration.
Step-by-Step Guide: Adding a Device to the Static Routing List
Accessing the Router Interface
To begin, access the MR9600 web interface by typing 192.168.1.1 into your browser’s address bar. Log in using your router’s credentials. If this is your first time accessing the router, the default username and password can be found on the device label.
Once logged in, locate the “Advanced Routing” section, typically found under the “Settings” or “Network” tab. This is where you’ll configure static routes.
Configuring the Static Route
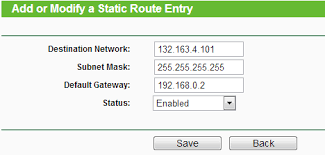
- Add a New Route: Click on “Add Static Route” to open the configuration panel.
- Enter the Device Details: Input the IP address, subnet mask, and gateway for the device. For example, if you’re routing traffic to a printer, ensure its IP address matches the one assigned to it in the network.
- Route Name and Metric: Assign a descriptive name to the route for easy identification, such as “Printer Route.” The metric determines the priority of the route. Lower values indicate higher priority.
Saving and Testing the Configuration
After completing the fields, save your changes and restart the router if prompted. Test the static route by pinging the device from a connected computer. If the device responds, the configuration is successful.
Optimizing and Managing Static Routes
Managing multiple static routes can be challenging if not organized properly. The MR9600 allows you to edit or delete existing routes, ensuring your network remains adaptable. To modify a route, return to the “Advanced Routing” section, select the route, and update the necessary details.
Regular monitoring of your network performance is recommended. Use network diagnostic tools to check for any inconsistencies or bottlenecks caused by misconfigured routes. Additionally, implement security measures, such as limiting access to the router interface and using strong passwords, to protect your network from unauthorized changes.
Conclusion
Static routing is a powerful tool for optimizing your network’s performance, and the Linksys MR9600 makes it easy to configure. By understanding static routing, preparing your network, and following the steps outlined above, you can ensure a stable and efficient connection for your critical devices.
Remember, regular maintenance and monitoring are key to keeping your network running smoothly. With the MR9600, static routing is no longer a complex task but an opportunity to enhance your network management capabilities.
FAQs
- What is the purpose of static routing in the MR9600?
Static routing provides a manual way to control data flow, ensuring stable and predictable network performance for specific devices. - How do I know if static routing is the right choice for my network?
Static routing is ideal for networks with minimal changes or devices requiring fixed paths, such as printers or servers. - Can I add multiple devices to the static routing list on the MR9600?
Yes, the MR9600 supports multiple static routes. Ensure each route is configured correctly to avoid conflicts. - What should I do if the device doesn’t connect after adding it to the static routing list?
Double-check the IP address, subnet mask, and gateway entered. Restart the router and test the connection again. - How can I remove or modify an existing static route on the MR9600?
Access the “Advanced Routing” section in the router interface, select the route, and make the necessary changes.
You May Also Read:https://trendbusines.com/raterpoint/